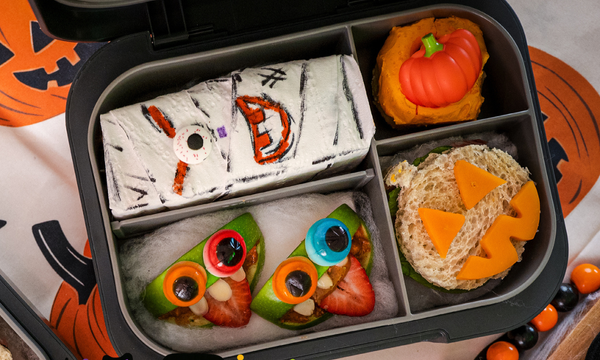
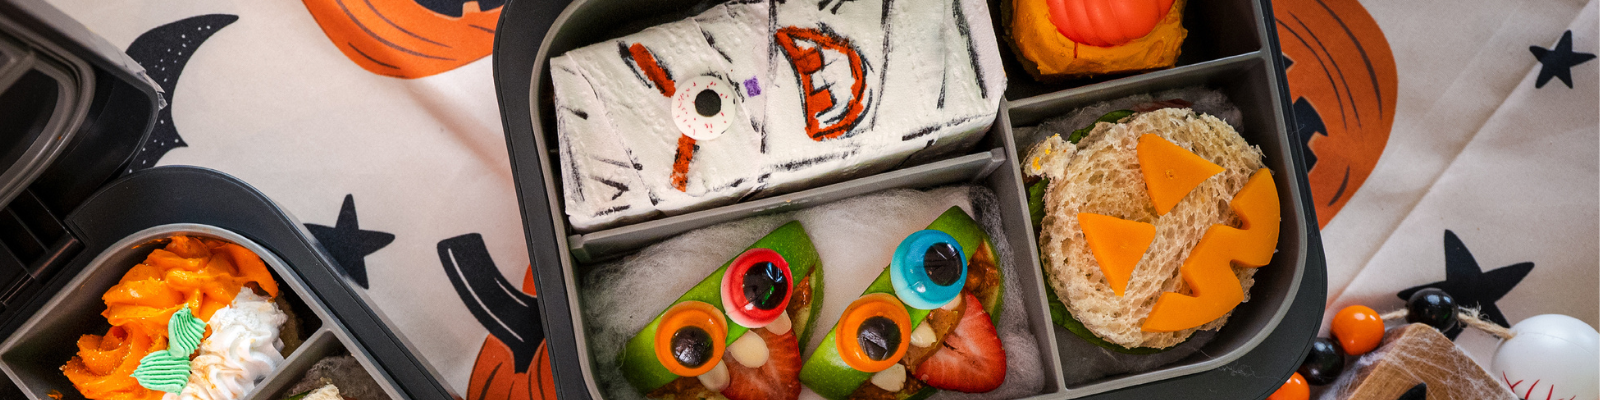
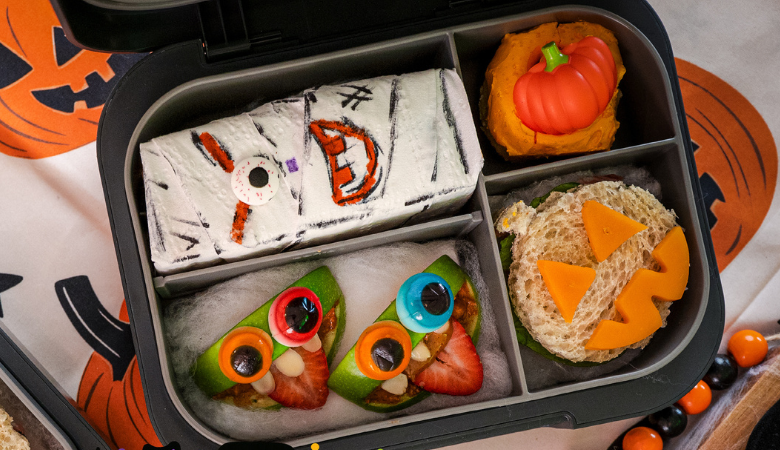
Halloween Bento Box

Mummy Juice Boxes
-
Start the Wrap: Secure one end of the gauze or crepe paper to the back of the juice box using a piece of double-sided tape or a dab of glue.
- Wrap Your Mummy: Begin wrapping the material around the juice box, overlapping the layers as you go. Crisscross the strips and keep it slightly messy to create a realistic mummy look.
-
Secure the End: Once the juice box is fully covered (leaving the straw hole clear!), trim the excess material and secure the final end on the back with tape or glue.
-
Give it Sight: Stick two googly eyes or eye stickers onto the front of the juice box, letting them peek out from between the "bandages."
-
Finishing Touches (Optional): For an extra touch of personality, use a black marker to draw a small mouth below the eyes.
-
Ready to Serve: Ensure the straw can be easily inserted. Your spooky mummy is now ready to quench a monster's thirst!
Notes & Tips
- Double-sided tape is a great mess-free option, especially when crafting with younger children.
- Don't worry about making the wrapping perfect! Each mummy should have its own unique and slightly unravelled personality.
Spooky Monster Apple Bites
-
Prepare the Apples: Wash and dry the apples. Cut each apple into quarters. Carefully use a small knife to cut a wedge out from the skin side of each apple quarter to create a "mouth."
-
Add Peanut Butter: Spread a layer of Western Family Peanut Butter inside the top and bottom of the mouth wedge. This will act as the "glue" for the teeth and tongue.
-
Create the Tongue: Place a thin slice of strawberry inside the mouth so it hangs out like a tongue.
-
Add the Teeth: Press slivered almonds into the peanut butter along the top and bottom of the mouth to look like jagged monster teeth. You can vary the placement to give each monster a unique, goofy grin.
-
Add the Eyes: Use a small dab of peanut butter on the back of the candy eyeballs to "glue" them onto the top of the apple slice.
-
Serve: Arrange your monsters on a plate and serve immediately for the best freshness and colour. Enjoy your spooky creation!
Notes & Tips
- Prevent Browning: To keep apples from browning if you're making them slightly ahead of time, brush the cut surfaces with a bit of lemon juice.
- Nut-Free Option: For a nut-free version, substitute the peanut butter with sunflower seed butter and use shelled pumpkin seeds or sunflower seeds for the teeth.
Spooky Pumpkin Sandwiches
-
Create the Pumpkin: Place one slice of bread on a cutting board and press the pumpkin-shaped cookie cutter firmly into the center to cut out the shape. This will be the top of your sandwich.
-
Carve the Face: Using a small knife, carefully cut two small triangles for eyes and one for a nose from the slice of cheese.
-
Build the Base: Take the second (uncut) slice of bread and spread an even layer of mayonnaise on it.
-
Add the Fillings: Layer the lettuce and salami on top of the mayonnaise.
-
Top it Off: Place the pumpkin-shaped bread on top of the fillings.
-
Decorate: Arrange the cheese triangle cutouts on the pumpkin bread to create the Jack-o'-Lantern face.
-
Serve: Enjoy your spooky creation immediately!
Notes & Tips
- Customize Your Filling: Feel free to swap the salami and lettuce for any of your favourite sandwich fillings, such as turkey, ham, or other sliced vegetables.
- No Waste!: Don't throw away the bread crusts or cheese scraps! They make a great snack on the side or can be toasted into mini croutons.
- Face-Cutting Tip: If you don't have a small knife, the corner of a clean, square-shaped cookie cutter can work well to punch out perfect triangles from the cheese.
Directions
Mummy Juice Boxes
-
Start the Wrap: Secure one end of the gauze or crepe paper to the back of the juice box using a piece of double-sided tape or a dab of glue.
- Wrap Your Mummy: Begin wrapping the material around the juice box, overlapping the layers as you go. Crisscross the strips and keep it slightly messy to create a realistic mummy look.
-
Secure the End: Once the juice box is fully covered (leaving the straw hole clear!), trim the excess material and secure the final end on the back with tape or glue.
-
Give it Sight: Stick two googly eyes or eye stickers onto the front of the juice box, letting them peek out from between the "bandages."
-
Finishing Touches (Optional): For an extra touch of personality, use a black marker to draw a small mouth below the eyes.
-
Ready to Serve: Ensure the straw can be easily inserted. Your spooky mummy is now ready to quench a monster's thirst!
Notes & Tips
- Double-sided tape is a great mess-free option, especially when crafting with younger children.
- Don't worry about making the wrapping perfect! Each mummy should have its own unique and slightly unravelled personality.
Spooky Monster Apple Bites
-
Prepare the Apples: Wash and dry the apples. Cut each apple into quarters. Carefully use a small knife to cut a wedge out from the skin side of each apple quarter to create a "mouth."
-
Add Peanut Butter: Spread a layer of Western Family Peanut Butter inside the top and bottom of the mouth wedge. This will act as the "glue" for the teeth and tongue.
-
Create the Tongue: Place a thin slice of strawberry inside the mouth so it hangs out like a tongue.
-
Add the Teeth: Press slivered almonds into the peanut butter along the top and bottom of the mouth to look like jagged monster teeth. You can vary the placement to give each monster a unique, goofy grin.
-
Add the Eyes: Use a small dab of peanut butter on the back of the candy eyeballs to "glue" them onto the top of the apple slice.
-
Serve: Arrange your monsters on a plate and serve immediately for the best freshness and colour. Enjoy your spooky creation!
Notes & Tips
- Prevent Browning: To keep apples from browning if you're making them slightly ahead of time, brush the cut surfaces with a bit of lemon juice.
- Nut-Free Option: For a nut-free version, substitute the peanut butter with sunflower seed butter and use shelled pumpkin seeds or sunflower seeds for the teeth.
Spooky Pumpkin Sandwiches
-
Create the Pumpkin: Place one slice of bread on a cutting board and press the pumpkin-shaped cookie cutter firmly into the center to cut out the shape. This will be the top of your sandwich.
-
Carve the Face: Using a small knife, carefully cut two small triangles for eyes and one for a nose from the slice of cheese.
-
Build the Base: Take the second (uncut) slice of bread and spread an even layer of mayonnaise on it.
-
Add the Fillings: Layer the lettuce and salami on top of the mayonnaise.
-
Top it Off: Place the pumpkin-shaped bread on top of the fillings.
-
Decorate: Arrange the cheese triangle cutouts on the pumpkin bread to create the Jack-o'-Lantern face.
-
Serve: Enjoy your spooky creation immediately!
Notes & Tips
- Customize Your Filling: Feel free to swap the salami and lettuce for any of your favourite sandwich fillings, such as turkey, ham, or other sliced vegetables.
- No Waste!: Don't throw away the bread crusts or cheese scraps! They make a great snack on the side or can be toasted into mini croutons.
- Face-Cutting Tip: If you don't have a small knife, the corner of a clean, square-shaped cookie cutter can work well to punch out perfect triangles from the cheese.